
My WHOLE STORE is on sale until Friday at 46% for my birthday - but Paisley Promises is 50% off for Fab 50 all week! Get them both for the price of one!
Wednesday, December 20, 2006
Get 'em while they're HOT
 Stumble it!
Monday, December 11, 2006
it's FAB-u-lous, DAHling!!!
My new kit FAB Fa-La-La is in the store now! CLICK HERE or on the photo to go there: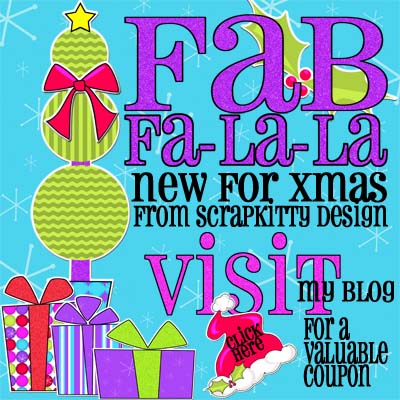
and for my VERY SPECIAL BLOG BUDDIES: Here's a coupon for 25% off - HAVE A FAAAAABULOUS Christmas!!!
 HAVE A FAAAAABULOUS Christmas!!!
Saturday, December 09, 2006
TUTORIALS - Templates, layered and unlayered
TEMPLATES:
WHICH KIND DO YOU NEED? –
There are two basic kinds of templates layered and not layered.
Layered templates usually come in .psd files. The .psd format preserves layers, whereas the .jpeg and .png format files do not. These work well in PS, PSE, and PSP. I’m not sure if other programs support them, you will want to try and see…CLICK HERE for a free template to practice on.
OK, first, let’s look at unlayered templates. These are simply graphics that are done in bold and contrasty colors – usually shades of black. What you need to know is how to select a single portion of that graphic.
To fill in: you can use a brush and paint – if you leave the marching ants, the color will only show up inside the selection. Keeps you in the lines easily!!
Or you can go to Edit>Fill and fill with the foreground, background, or use the color picker…
Make a pattern out of your paper!!! Open a paper and go to EDIT>Define Pattern. You can name this pattern anything you’d like! Now when you go to select a pattern, you will see your paper there!
This is a great way to do many template pages with the same kit – make patterns out of all your papers and fill fill fill!!!
CUTTING OUT OF PAPER
But the fun thing to do is to cut it out of a paper.
If I have a small area to cover, I usually don’t bother to drag the whole thing, I will use my marquee tool (the dotted line circle or square) and cut out a little piece (CNTRL+C) and paste it onto the template (CNTRL+V). When you paste, it will make itself a new layer. Then move that layer so it covers the part you selected.
Next, at the top click SELECT>INVERSE. This changes the selection to everything that was NOT selected before.
Now, hit CNTRL+X to delete that. You are left with a piece of paper just the same shape as the template shape!!! Repeat this for every shape on your template.
Remember to save this under a different name, so you don’t lose your template!
LAYERED TEMPLATES
Layered templates are just as much fun, or more! There are a few advantages to layered templates, such as the ability to move them around, or delete an element you don’t wish to use.
FILLING WITH COLOR
This works pretty much as above, except you need to have the layer you wish to use selected. Once your layer is selected, use your Magic Wand to select the element, and EDIT>FILL to fill with a color.
See the instructions above for filling with patterns, and making patterns out of papers!
First, open your template and any papers you think you would like to use in the layout.
Use a clipping mask to make this fast and easy – and more flexible!
There is NO NEED TO SELECT THE ELEMENT IN THE LAYER.
Hit CNTRL+G (CS2 users, ALT+CNTRL+G or roll your cursor over the line between the layers until you get two little circles, and click) AND THE PAPER IS CUT IN THE SHAPE BELOW IT!!
Now you can use your move tool to drag the paper around inside the object until you get the pattern set the way you like it! This is GREAT for putting photos inside shapes – use a photo instead of paper – all the same steps apply.
Once you have it the way you like it, you need to merge the two layers CNTRL+E or Layers>Merge Downward
To minimize the number of layers in your document, you can either drag the template layer you are done using to the trashcan at the bottom of the layers palette, or you can hit CNTRL+E to merge the paper layer with the template layer below. (Using the menus, go to LAYERS>Merge downward
Repeat this for every element in the template you want to use. You can then delete any unused layers, and move or resize the elements on any layer. These are the most versatile templates, because you have the ease of a pre-made design, with the personality of your own touches!!
Wednesday, November 15, 2006
HALF PRICE THRU FRIDAY 11/17
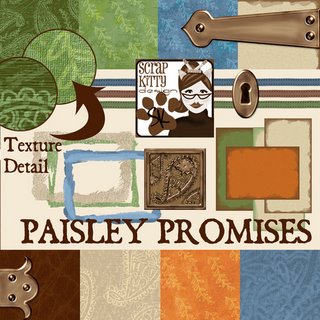
 Everything in my store is on SALE at 50% off through Friday! Don't miss this chance to grab all three of my coordinating kits:
Paisley Promises
Embroidered Eloquence
Paisley Promises Add-On Kit
These kits not only coordinate with each other, but also with the P4D BCA3 kit, and any other kits derived from that project.
Stop by my store by clicking HERE
Wednesday, October 25, 2006
Fab50 - I have TWO kits on sale!
Friday, October 20, 2006

Monday, October 16, 2006
C'mon and get STONED!
My new kit just hit the store TONIGHT!! I'm so excited about this one - so many cool things you can do with it!
STONE COLD GORGEOUS
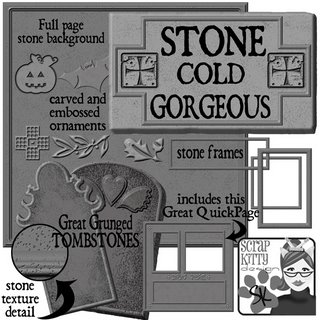
this kit includes beautifully textured stone elements, perfect for all your Halloween projects - use the stones as backgrounds, journaling blocks, and personalize your projects with my really cool carved ALPHA!
I even included a quickpage for easy invitations or great gothic layouts!
AND
if you buy the kit and post a LO using ANY of the pieces of the kit, I'll send you free the add-on kit that's not even in the store yet! Just post a link to your LO here, at the bottom of this post...
HAPPY HAUNTING!
Sunday, October 01, 2006
ATTA Girls get going!
Jen has been under the weather with a migraine, so it's up to us to keep the lovin' comin'!
click here for today's link and go make someone's day a little brighter!
Saturday, September 23, 2006
MY KIT IS A FREEBIE!! WHOO HOO!

Tomorrow is a big day at SOTB - and you can get my mini kit as a FREEBIE if you come to one of the FOUR crops tomorrow! Wow!
Click here for more information about the American Cancer Society Charity Kit and Crops - this is a really wonderful, truly MEGA kit, and for one of the best causes!
Wednesday, September 20, 2006
Feeling Even More Scrappy? Friday Night Crop
Join me for another fun Friday night chatting and cropping!
FRIDAY, SEPT 23 9PM SOTB (see link below!)
I am working hard on surprises for this crop, including freebies from a brand new kit - the crop kit will be uploaded tomorrow, so stop by the Fab 50 crop tomorrow at 10PM at SOTB for a link - http://www.scrapoutsidethebox.com/chat/FRIDAY, SEPT 23 9PM SOTB (see link below!)
Here's a sneak peek at the kit I'm working on for the crop:
 SEE YOU THERE!
Calendar of Hope Mega Kit - support this good cause!
CALENDAR OF HOPE at Scrap Outside the Box
|
Many of the Scrap Outside the Box designers have been affected by Cancer of their loved ones and wanted to do something to help others suffering from the same difficulties. They decided to create this lovely kit and donate the funds to the American Cancer Society.
COMBO KIT - GET both kits and save $2.00 |


CLICK HERE to go to the store for details.
Tuesday, September 19, 2006
Come ON ATTA Girls -
Have you left someone lovin' today?
Visit the blog for the daily link here
http://scrapkittydesign.blogspot.com/2006/09/atta-girls.html
then GO MAKE SOMEONE'S DAY!!!
Tuesday, September 12, 2006
ATTA Girls - BLINKIE CHALLENGE

Well, Tina gets the honor of coming up with the first ATTA Girls blinkie - right click to grab it! Now the rest of you scrappy girls get busy and do one in your own favorite style! That way people can find something that 'works' with all their other blinkies :) And don't forget to check today's link - while you are free to comment on any LO you want, it will be really cool if a WHOLE BUNCH of us post on the same one in the same day! So do the link, if nothing else! Thanks girlies!!! You all are the BEST!
Friday, September 08, 2006
WE ARE SOOOO SCRAPPY!!!
Thanks so much to everyone who came to my crop at SOTB - we had a BLAST!!!! I didn't log off till 10:45 - (ever have those guests who wouldn't leave?)
To say thanks for those who came - (and those of you who didn't, but chose to visit my blog today) here is a little quickpage freebie:
http://www.yousendit.com/transfer.php?action=download&ufid=CA34ADDC56A4EB84
watch for more Feeling Scrappy Friday crops at SOTB!
ATTA GIRLS!
Some of us girlies think we need more comments on LO's at SOTB, so we have a FUN way to rectify that - you've all seen Hummie's Kudos Team?
http://hummdingertub.blogspot.com/2006/07/kudos-team.html
join it if you can, it's fun.
AND we're going to do the same thing for SOTB -
if you want to be an ATTA Girl, here's what you do...
to join our yahoo group and get a daily email reminder with a link
click on that link, and you will be taken to the SOTB blog, where you can find our layout of the day! Then click on the layout link, and leave some love!
If enough of us do this, we can make lots of people happy, and how often can you do that!!!!
Wednesday, September 06, 2006
FEELING SCRAPPY?
I'm hosting my FIRST crop EVER
at SOTB on Friday, September 8 at 9PM!
Please come join me for all the fun - I have a great crop kit available for download, and a wonderful posting bonus!CLICK HERE to see the preview!
CLICK HERE to for all the crop information
CLICK HERE to download the crop kit
CLICK HERE to attend the crop
I'm looking forward to seeing everybody there!
Monday, August 21, 2006
A Lesson on Pixels
OK girlies - we need a lesson on pixels, and dpi. (or ppi - same thing, for our purposes)
When your camera captures a picture, it is capturing a set number of pixels. A 3.2 MB camera captures 3million2hundredthousand pixels, 5MB 5 million, etc. That is the MAXIMUM number of pixels it can capture. However, once it captures them, it has to store them on your card.
SO - it allows you to capture FEWER than the maximum, hence the lower settings.
MY CAMERA:
5.0 megapixels
Maximum capture: 2592pixels across, 1944 pixels down.
Second best: 2048 pixels across, 1536 pixels down.
Third best: 1600 pixels across, 1200 pixels down.
least best: 640 pixels across, 480 pixels down.
WHERE IS THE DPI?
dpi is actually a printing term, referring to the number of dots the printer will put on an inch of paper to make the print.
72dpi means 72 dots across, 72 dots down in each inch = total 5184 dots per square inch.
300 dpi means 300 across, 300 down, total 90,000 dots per square inch.
Now those of you who cross stitch, know that the more little squares make up your picture, the more detail you can put in that picture.
SO: say I take a picture at maximum capture with my camera - 2592 across, 1944 down.
IF I view it at 300 dpi, you would divide 2592 by 300 = 8.64 inches across
divide 1944 by 300 = 6.48 inches down
IF I open it up at 72 dpi, you would divide 2592 by 72 = 36 inches across
divide 1944 by 72 = 27 inches down.
SAME number of pixels, but at 72 dots per inch, you have spread them out widely. If you squish them together so you are looking at 300 of them in one inch, you have a much smaller photo.
When you are opening up a photo in image editing software (PS,PSE, whatever), it is choosing for you a dpi to view it at. It seems that you girls have your default set to 72. There is a place to change that in PS, I'd have to look for it - I have mine set to open everything at 300.
RECAP -
CAPTURE - The megapixels on your camera is the number you are CAPTURING. The more pixels you capture, the larger you can print that photo at a higher dpi. Obviously, more is better. BUT - what about space on your card? Let's talk about JPEG. JPEG compresses those pixels so you can get more on your card. Some cameras will allow you to change to a higher compression, so you can squeeze more photos on the card. That's kinda like stuffing clothes in your suitcase. If you fold them nicely, and don't pack them too tightly, they will come out with minimum wrinkles. If you insist on folding them really tiny, and smashing as many as you can get in there, they will come out all wrinkled up. SO, you don't want to squish those photos up any more than you have to.
My camera doesn't allow that.
I have a 512 MB card. It holds 237 photos at highest resolution, 369 at the next, 588 at the third best, and 2089 at the lowest. It was less than $25. We actually have 2 of them, for vacations, but I rarely use the second. 237 is the most I need to be shooting at one event (I did max out a card at the second grade show last year!) without dumping them to the computer. Your camera card is not meant to be a long term storage device, you should be cleaning it off regularly. It is too vulnerable to being damaged, having your camera lost or stolen, to keep photos on there longer than necessary.
OUTPUT - the dpi (dots per inch) or ppi (pixels per inch) is the number of those captured pixels you are squishing into one inch. The more per inch, the sharper you photo will look. The fewer per inch, the larger your print will be, unless you crop it, and fuzzier it will look.
So, Lori and Hummie, open up a picture, turn on your rulers, and see how large those photos are. Go into image size, change ONLY the dpi setting, and you will see the number of inches change. You have not changed the pictures, just squished more into each inch.
Photographic prints are printed at 300 dpi (usually). So are good press prints. Your computer or TV can only show a MAXIMUM of 72 dpi, so if you are NEVER going to print or enlarge or crop, working at 72 dpi is fine. I can never be sure when I will want to print a photo, so I just do everything at 300, and switch it down for uploading to the web.
As a rule, it is a good idea to capture as MANY pixels as you can. I leave my camera set on HIGH all the time. I'd rather have too much information, than not enough. That way, if I want to crop it to show the kid in the corner with a goofy look on his face, and enlarge that photo to 4x4 inches, it won't be all grainy. 'Cause you never know when you will need to crop the heck out of a photo!
This is why designers create at 300 dpi - because if I make a tag to be 1"x2", and you want one that is 4"x8", when you enlarge it I want it to still look OK. If I made that tag at 72 dpi, then when you enlarged it, it would have only 18 pixels per inch, which you could clearly see each pixel. Make sense?
I'm sorry to get on the soap box, but this stuff confuses everybody! I want you all to make the best images and the best layouts you can!
Hope this makes sense, and answers those questions about what to set your camera to. Anybody have any questions, just ask!!
Jenn
Saturday, August 19, 2006

Coming Soon!
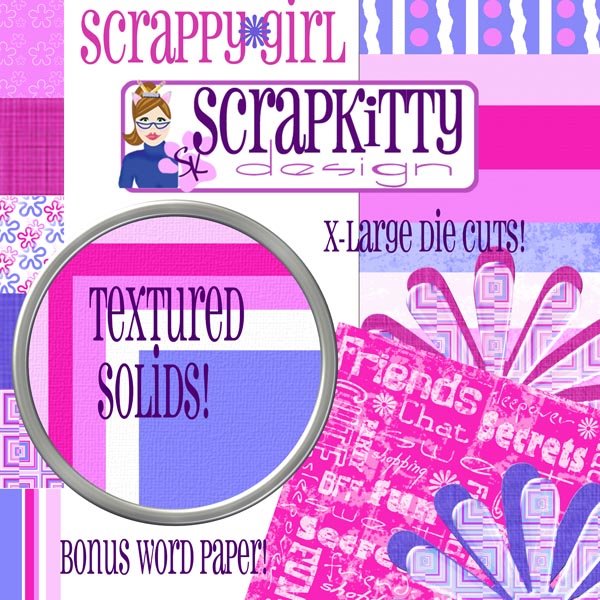
Scrappy Girl - new kit from ScrapKitty Design at Scrap Outside the Box
This girly girl kit is packed FULL of cool elements just right for your pretty girls - Check out the license plates and frames - perfect for journaling! TWO alphabets, lots of beads and bauble, and many, many great papers you will use for everything.
Check back here soon for more information about how to get the FREE crop kit and posting bonus!
Thursday, August 10, 2006
Bandana Paper

I made this for a friend, and thought I should share it with you!
sorry, this freebie is over, watch for this paper in a new kit at my store at SOTB
Tuesday, August 08, 2006
Almost Here!
 Here is a preview of my first kit - I wanted to do classic Red White and Blue for all those great summer photos!
This kit includes:
8 colored papers, PLUS a textured white paper,
three tags,
4 ribbons,
4 bows,
8 brads,
6 metals - staples, clips, brads,
1 gold border
2 gold embellishments
and a beautiful gold alphabet including numbers and punctuation!
This is a wonderful classic addition to your collection that you will use over and over all year!
SOON to be on sale at Scrap Outside the Box - watch this space for a link to my store!
Monday, August 07, 2006
First Ever Freebie!

While I am waiting for my kit to be approved for sale at Scrap Outside the Box, I thought I'd give everybody an early freebie from the crop kit! This word art will coordinate with my Face of Freedom kit, available soon, as well as the crop and bonus kits.
Sorry, this freebie is over, watch for a Feeling Scrappy Friday crop at SOTB to feature this kit!
Sunday, July 16, 2006

Subscribe to:
Posts (Atom)


